Help with ws2811 RGB LED strip raspberry_pi
Introduction I've already read a lot of tutorials explaining how to control a RGB LED-Strip with a Raspberry Pi. However, these were often unspecific, too technical, or even incorrect. Because of this I've written a short but simple tutorial explaining how to control a LED-Strip. This does not require much effort and even laymen should do it.
How to connect RGB Strip LED Lights to Raspberry Pi Zero W and control from Node.js
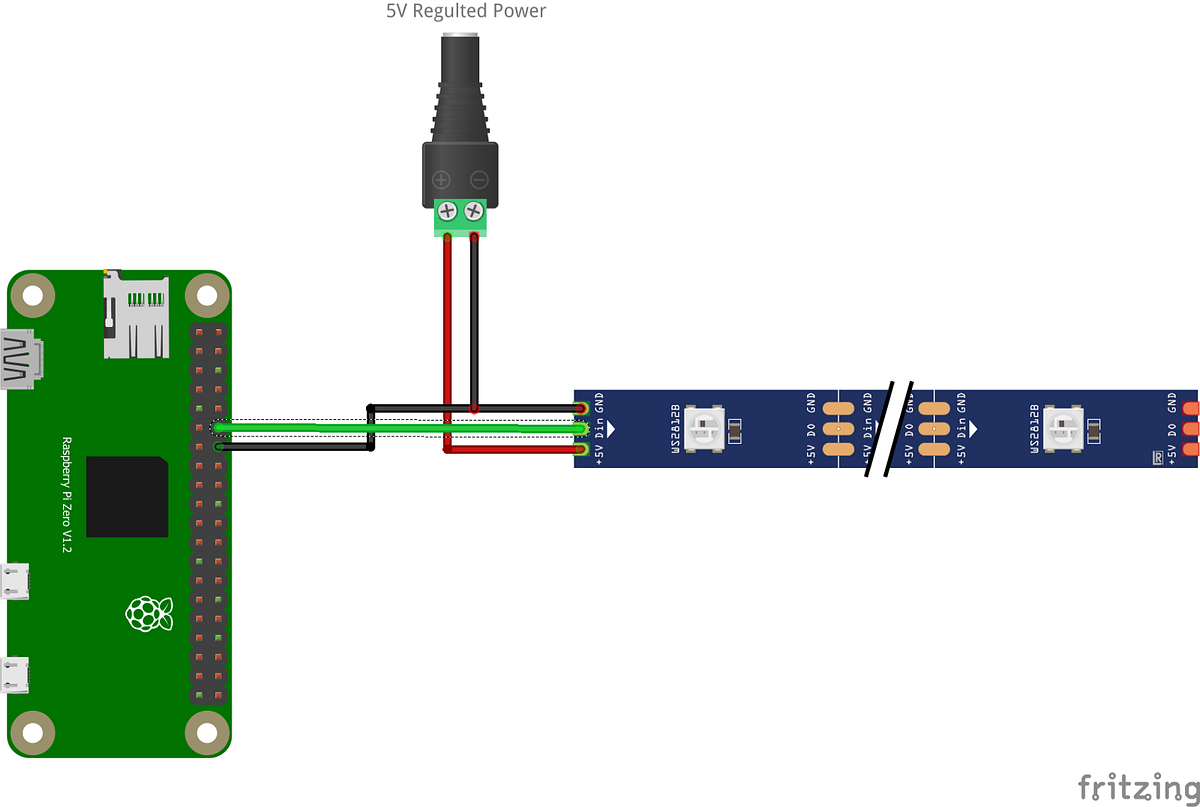
The main difference to keep on top of is whether the LED strip runs on 5V or 12V. As our Raspberry Pi Single Board Computer runs at 5V we want to use the 5V WS2812B Strip. Otherwise, we will need to use extra hardware, like a DC-DC Step-Down Module, to accommodate the 12 Volt power requirements. WS2812B LED strips also differ in LED Node densities.

Pin on Raspberry Pi Electronics Projects
The trick is using the Raspberry Pi's little-documented Secondary Memory Interface. The SMI hardware allows the Pi to shift out data to 8 or 16 I/O pins in parallel using direct memory access.

Driving RGB LED strip with Raspberry Pi and LightshowPi YouTube
Method 2: Python via SSH and Nano. If you have connected to your Raspberry Pi via SSH, you can create this program from the command line. Create a new script in Nano by typing: sudo nano blink.py. This will open up a new file in the Nano editor called blink.py.
A Raspberry Pi powered LED strip. Directions in the comments. r/raspberry_pi
Learn Videos How To Use Addressable RGB WS2812B LED Strips With a Raspberry Pi Single Board Computer We are getting our Blinkies Popping Off In HERE ! Our latest UPDATED guide will demonstrate the fastest and most customizable way to have WS2812B LEDs controlled by your Raspberry Pi.

China Raspberry Pi RGB LED Strip Manufacturers, Factory Customized Raspberry Pi RGB LED Strip
You have the choice between two possibilities: With a plug adapter and power supply, the plus and minus poles can be easily connected to the LED strips. For beginners: Power adapter ( US / UK) + plug-in connector ( US / UK) (c.f. picture on the right) For experienced: Switching power supply ( US / UK) + power cord ( US / UK)
Configuring and Programming a Raspberry Pi to control an LED strip by Gregg Larson Medium
How to power loads of LEDs with a single Raspberry Pi Pico - Raspberry Pi How to power loads of LEDs with a single Raspberry Pi Pico 14th Jan 2022 Ben Everard 5 comments Lovely Ben from HackSpace magazine shows us how to power up to 26 strips of NeoPixels from a single Raspberry Pi Pico.

LED strip and RGB LED software Raspberry Pi LED Spectrum Analyzer Adafruit Learning System
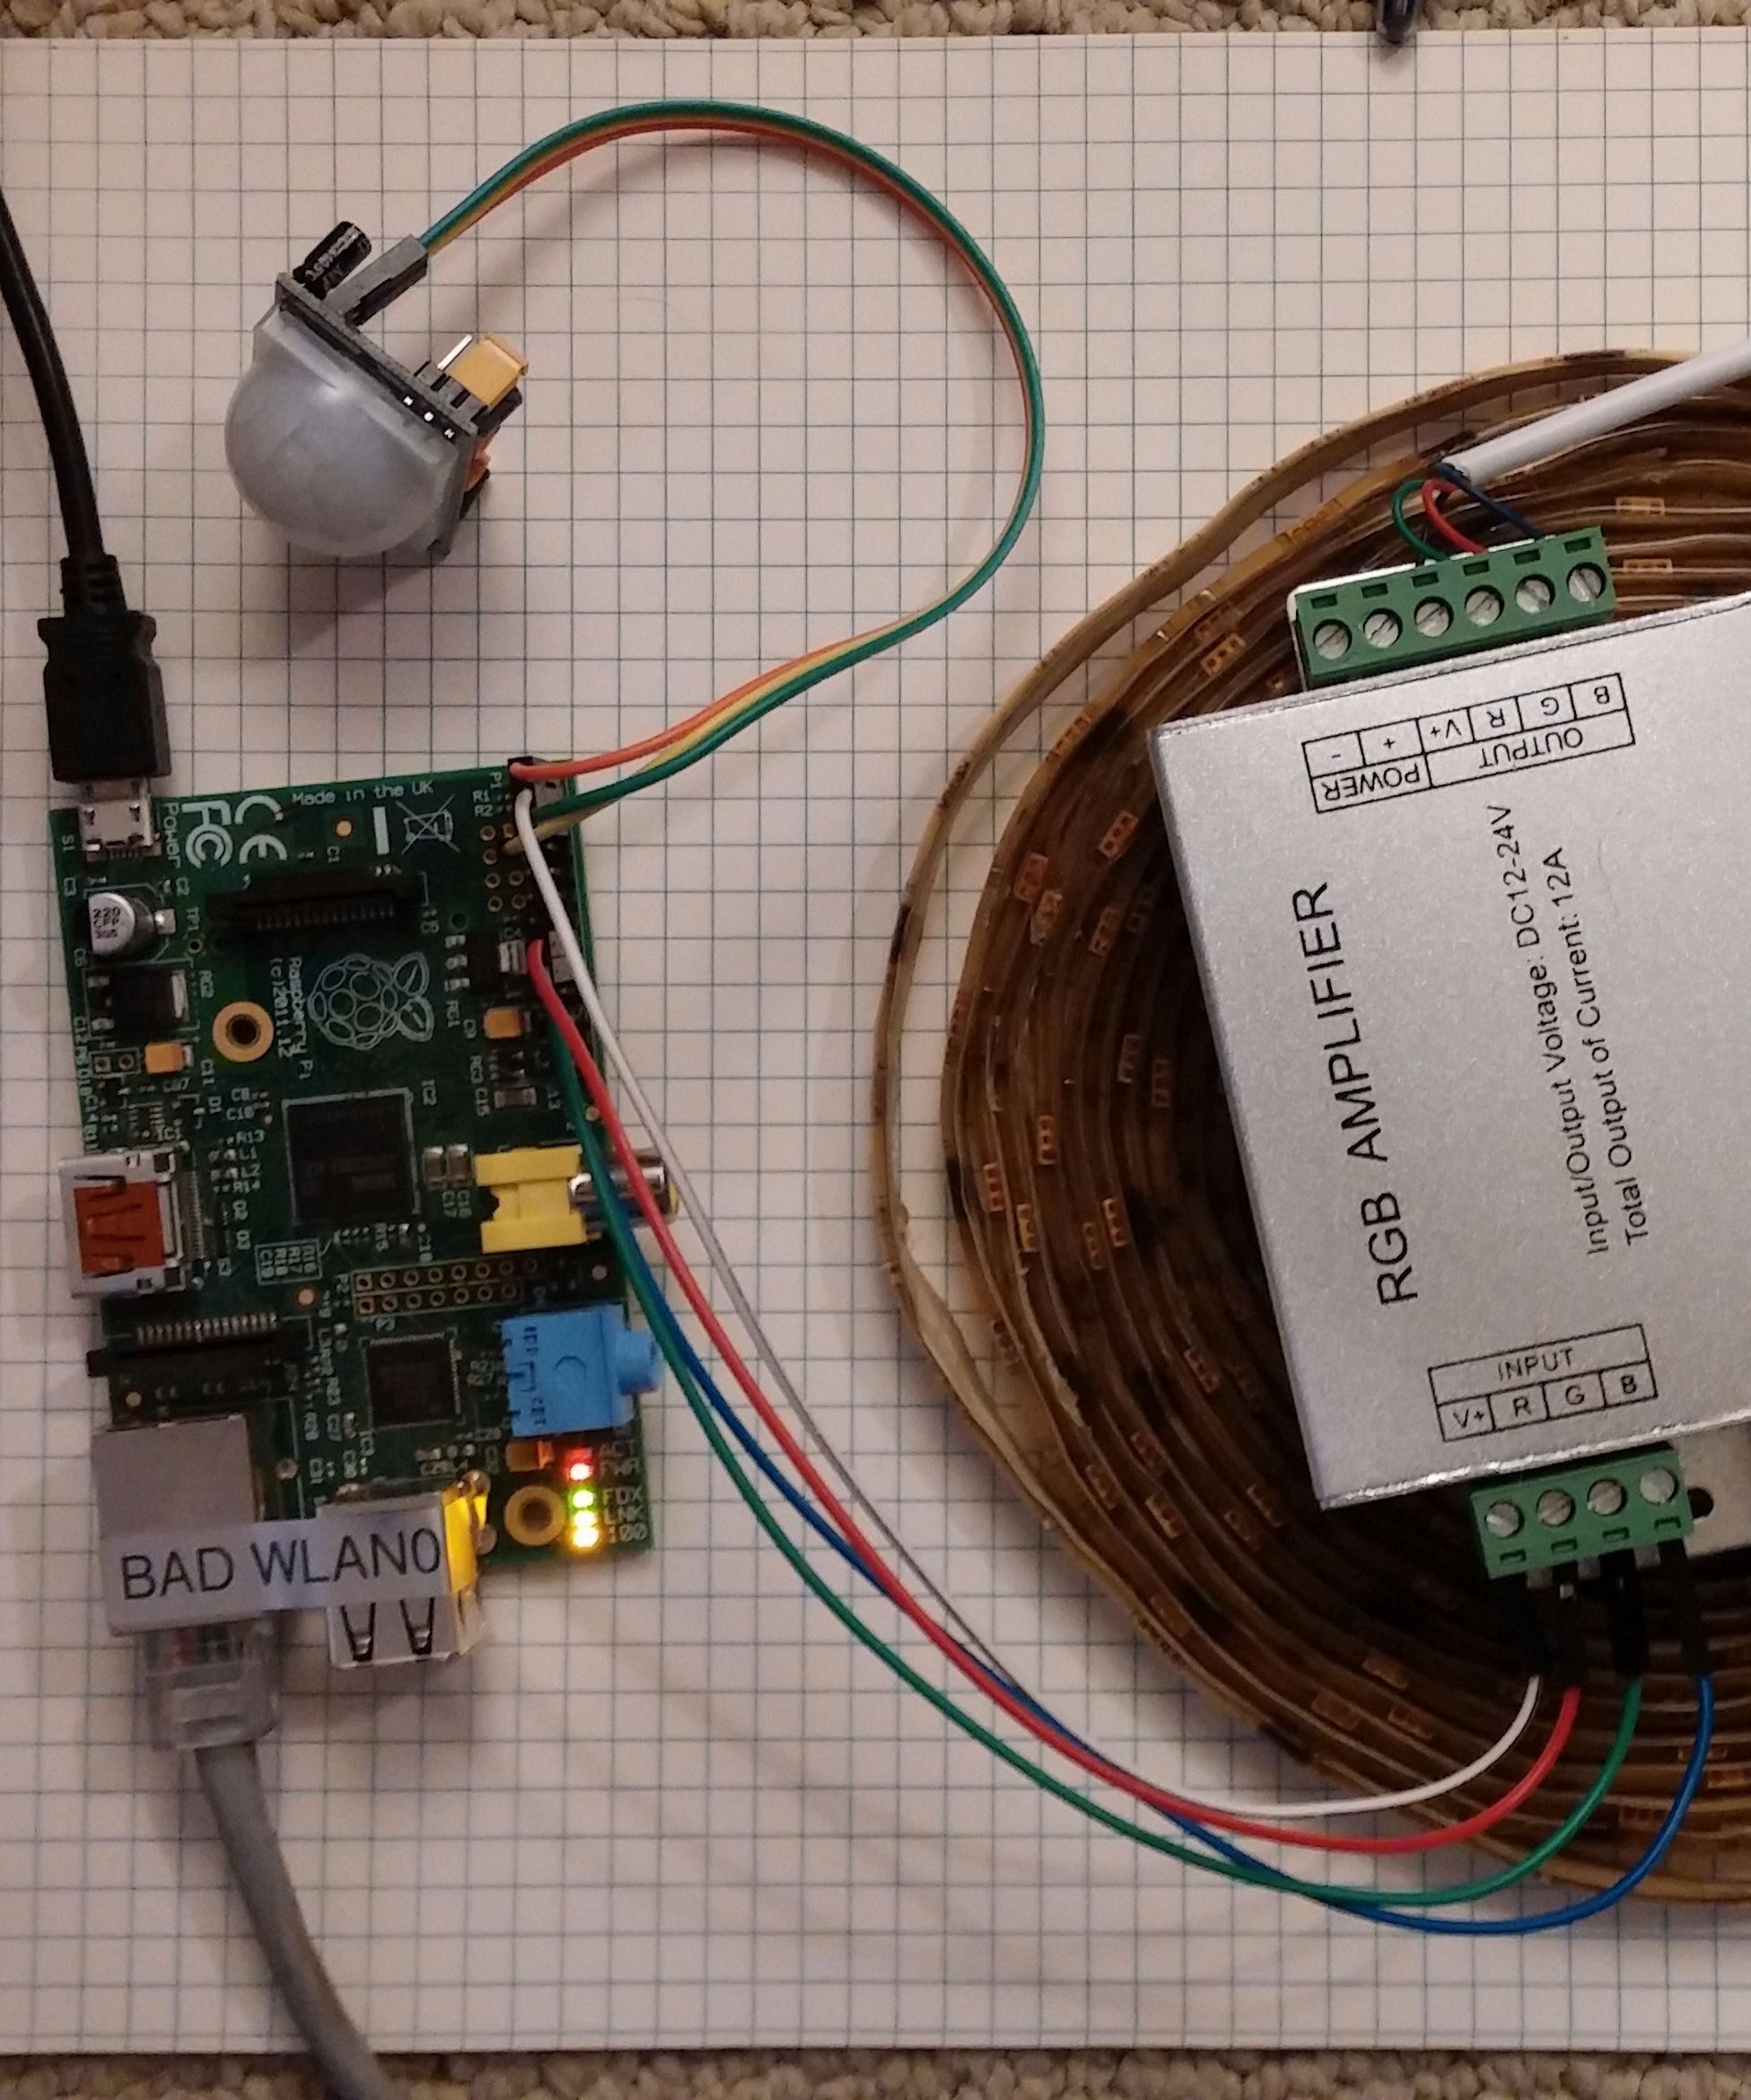
Step 1: Connecting Is Trivial! Connect the +5V pin of your Pi to the +12V input of the amp with a male-female jumper lead. Connect 3 GPIO pins (GPIO 4,5,6 are a good choice) to the R, G & B inputs of the amp with three male-female jumper leads. The amp will come with two short connectors for the LED strips. Use one to connect to your LED strip.

LED Strip connected to Raspberry Pi. How to make it work? led
We can now go ahead and install the apa102-pi Python package. This package is designed for the Raspberry Pi to handle all the grunt work for talking with and sending data through to the APA102 LED strip. Install the APA102 Python package by running the following command. sudo pip3 install apa102-pi Copy. 4.

Raspberry Pi Controlling LED Strip Lights (5v) YouTube
These two LED strips are very different, but both can be controlled with the Raspberry Pi. After using the latter in a previous tutorial and using it in our Ambilight, this tutorial is about using the Raspberry Pi WS2812 RGB LED Strip. The models WS2812B and WS2811 are also compatible and can be addressed with this guide.

Connect and Control WS2812 RGB LED Strips via Raspberry Pi
How to Control an RGB LED Strip with a Raspberry Pi I've previously read several tutorials explaining how to control an RGB LED strip with a Raspberry Pi. Yet they were often vague or even inaccurate. As a result, I've written a brief yet straightforward tutorial explaining how to control an LED strip.

Raspberry Pi LED strip YouTube
RGB Strip Software Grab the software and follow the instructions on that page for getting the Pi able to output to SPI. Do install spidev. It's important that you use the hardware SPI because any bit-banging approach won't be fast enough. sudo raspi-config to enable hardware SPI (follow instructions at git page).

How to control a neopixel LED strip with a Raspberry Pi Pico •
GPIO pins can be used to control individual LEDs. The board can also control LED strips—some of which offer individual LED control. Table of Contents. 1 - Set up and use MicroPython. 2 - Control the on-board LED. 3 - Control a separate LED. 4 - Control a LED strip. 5 - Add your LEDs to a project.

How to connect RGB Strip LED Lights to Raspberry Pi Zero W and control from Node.js
Setting up a new raspberry pi to be used in remote situations can be "cumbersome" because, instead of plugging in a keyboard, mouse, and monitor, and using a GUI, we'll be using wifi and.

Raspberry Pi Controlling RGB LED Strip Lights (12v) (Updated) YouTube
Step 1: Required Materials and Supplies 1 x Raspberry Pi ( I used a Pi 2 Model B) MicroSD card Something to power your Pi (USB cable and AC power adapter) 1 x USB WiFi adapter OR an Ethernet Connection 1 x USB to Serial Cable - https://www.sparkfun.com/products/12977 1 x GPIO breakout - https://www.sparkfun.com/products/13717
Easiest RGB LED Strip With Raspberry Pi! Instructables
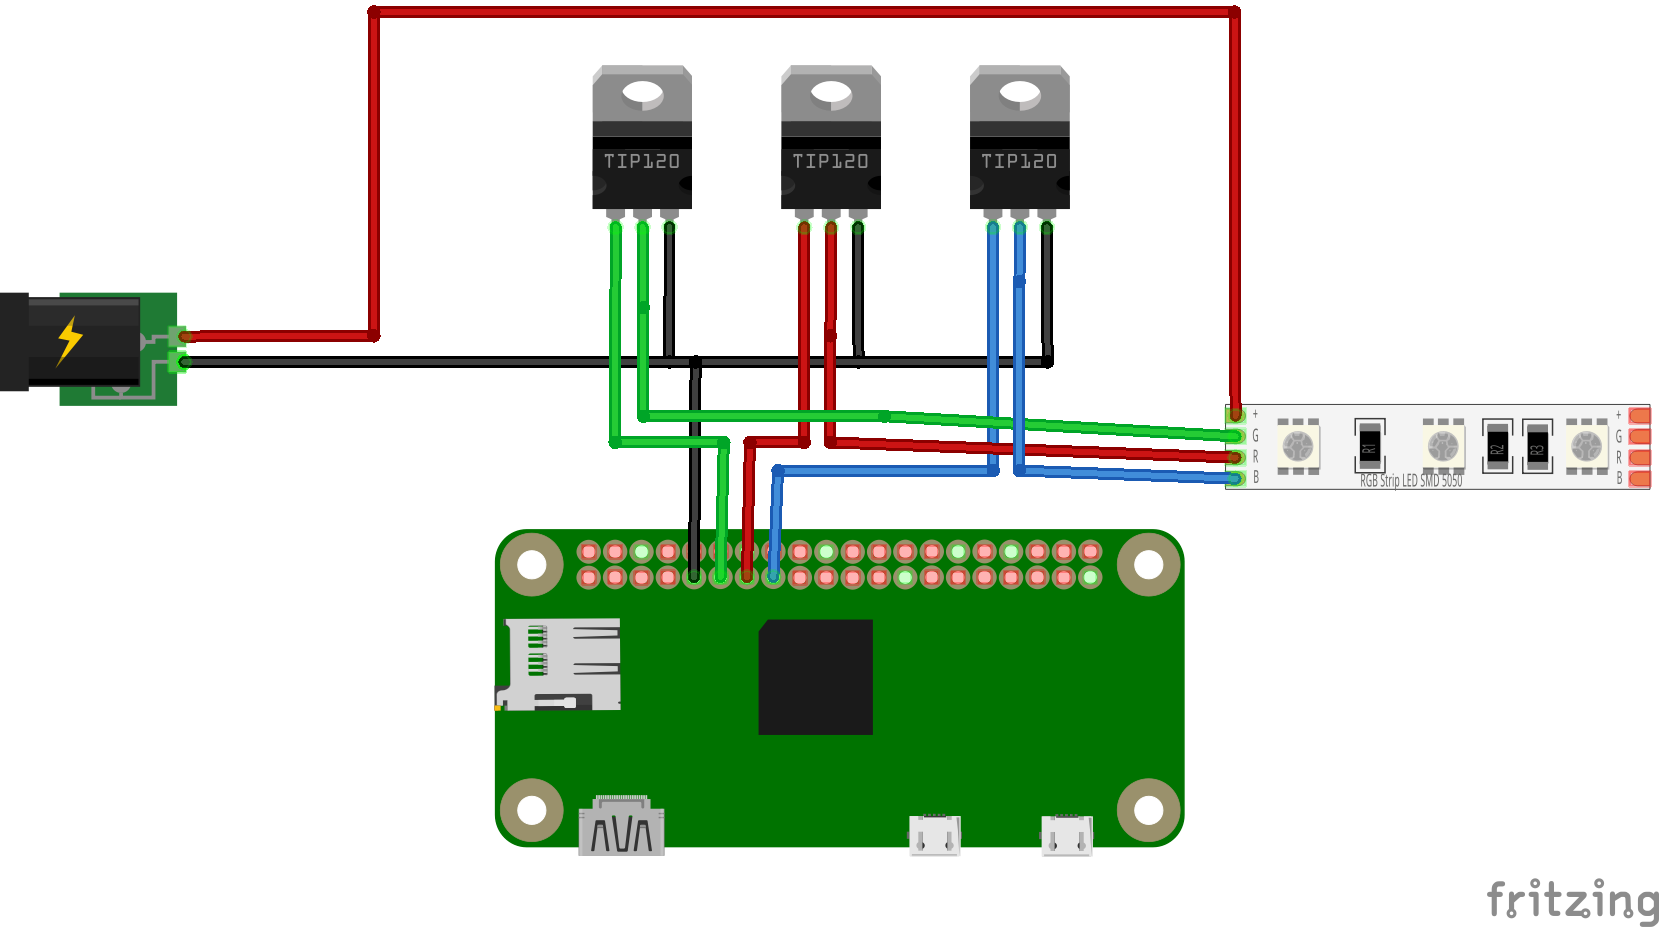
Method 1: Using MOSFET and PiGPIO. You will need the following materials: Three-pin RGB LED strip with one pin for the 12-volt DC. A breadboard - this is where you will plug all the components. Jumper cables that you will use for the relevant connections. Ensure it has male and female wires.
